


2x2 video wall
How to Configure an LCD Video Wall Display
DIGITAL SIGNAGE - LCD VIDEO WALLS
How to Configure an LCD Video Wall Display (Complete 2x2 Setup Guide)
LCD video walls turn multiple screens into one large, high-impact canvas for retail, reception, hospitality and control room environments. In this guide, we explain how LCD video walls work, what a customer needs when purchasing a 2x2 video wall, how daisy chaining works, why bezel size matters, and how video walls improve ROI. If you need specialist help, ScreenMoove Experts can support your project from planning through to configuration.
2x2 checklist - what you need Daisy chain - clear explanation Bezel guidance - what we recommend ROI - how it pays back
Guide
Installation + configuration
Setup
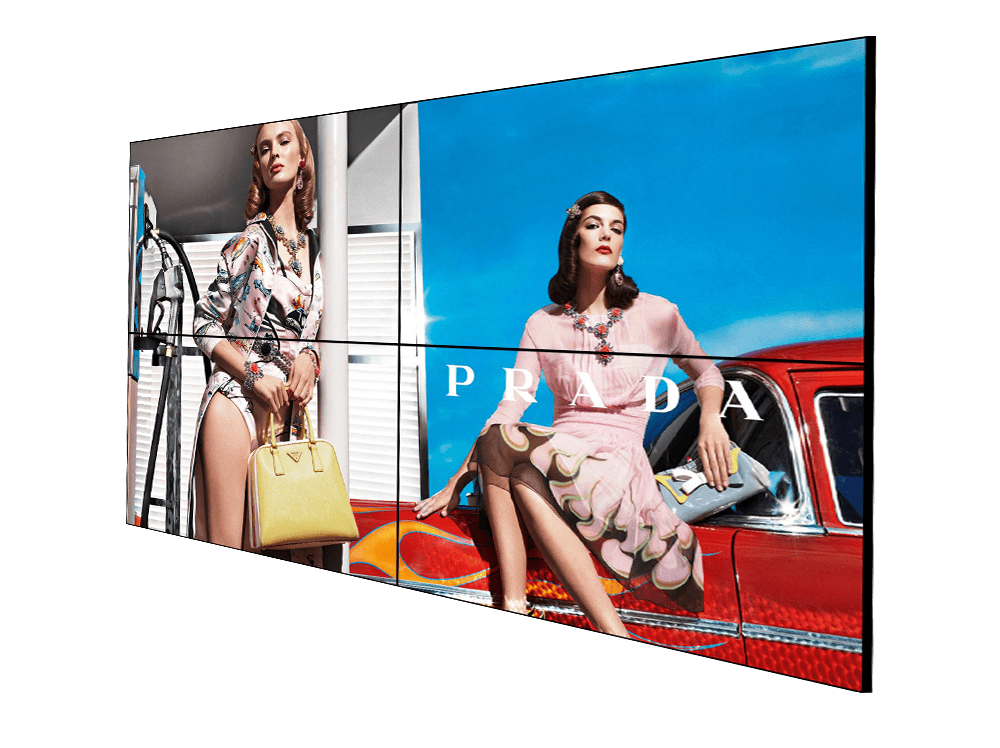
2x2 LCD video wall (4 screens)
Best for
Retail, reception, hospitality, control rooms
Support
ScreenMoove Experts available

How LCD video wall displays work
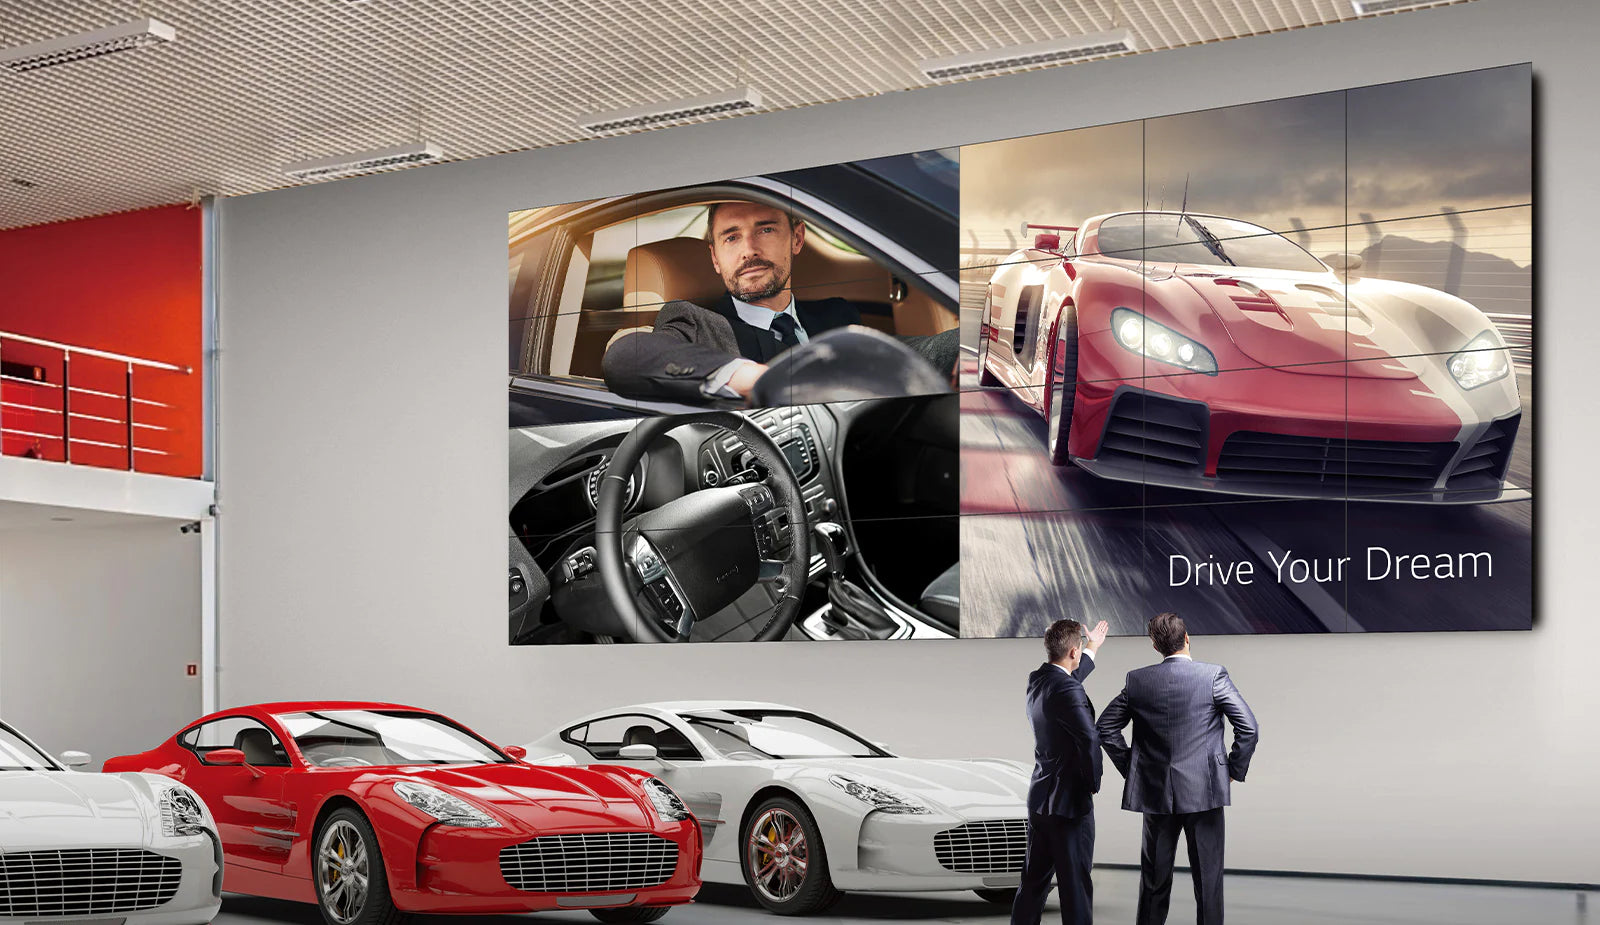
An LCD video wall is a multi-screen display system that combines two or more commercial displays into a single, large-format viewing surface. In a 2x2 configuration, four displays are arranged in a grid and configured so each screen shows a dedicated portion of one full image or video. The result is a high-impact canvas that can deliver premium branding, advertising, promotions, menus, dashboards or live feeds.
The reason businesses choose video wall panels (rather than four standard TVs) comes down to reliability and control. Professional video wall displays are engineered for commercial duty cycles, consistent brightness, predictable colour reproduction, and advanced features such as tiling (video wall mode), rotation options, and DisplayPort connectivity for daisy chain setups. These details matter when you need the wall to look seamless, run for long hours, and stay consistent over time.

What we need to achieve when a customer purchases a 2x2 video wall: perfect alignment, clean signal distribution, correct 2x2 configuration, consistent colour and brightness, and a publishing workflow that makes updating content quick and reliable.
What a customer needs for a 2x2 LCD video wall
When a customer buys a 2x2 video wall, the system is more than four screens on a wall. A successful install depends on the right components and the right setup steps. As a minimum, most customers will need:
4x professional LCD video wall displays
Commercial-grade panels with tiling features for a true video wall build.
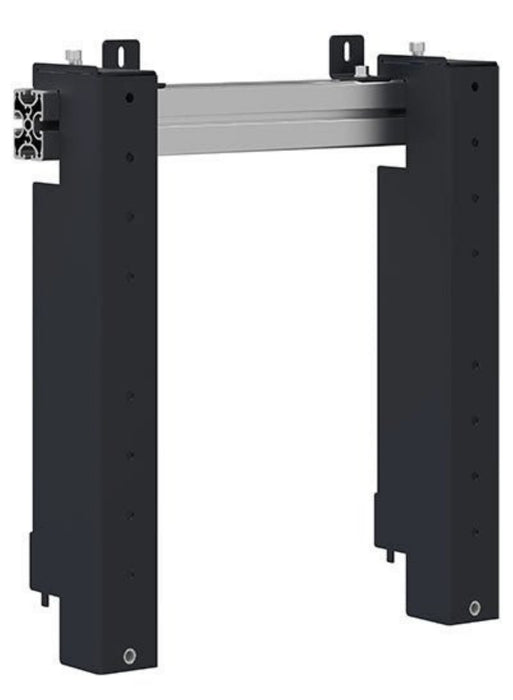
Video wall mounting bracket
Micro-adjustment alignment for perfect grid spacing and clean bezel joins.
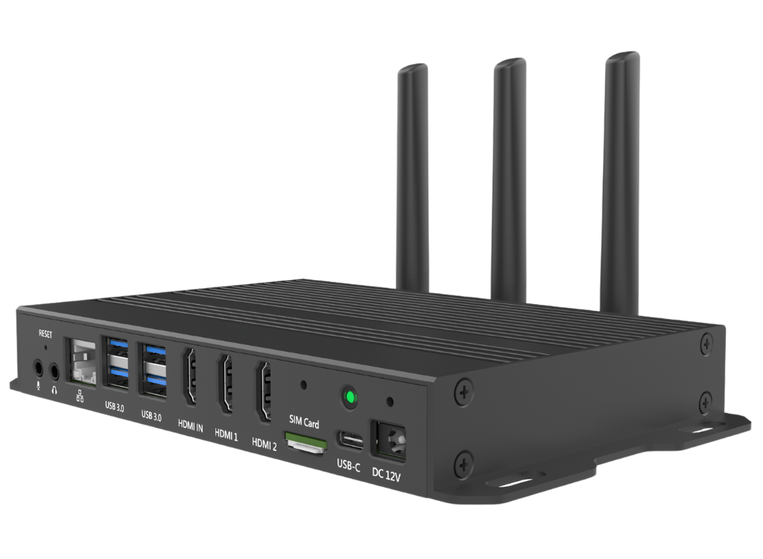
Media player or PC
Your publishing source - chosen based on content type, updates and control needs.
Correct cabling plan
Signal + power routing (often DisplayPort) to keep the install tidy and reliable.
Configuration and calibration
Video wall mode, positions, resolution, scaling, and brightness matching.
1) The screens - why video wall panels matter
Video wall panels are purpose-built to tile content across multiple displays. This means each screen can be assigned a position within the grid (top-left, top-right, bottom-left, bottom-right) and automatically shows the correct quadrant of the full image. Many panels also support uniformity controls, helping the wall look consistent across all four screens.
If you are comparing options, pay attention to bezel width (covered below), brightness, operating hours, and connectivity. If you want a quick way to browse suitable options, start here: View LCD video wall displays
2) The bracket - why a proper video wall mount is essential
A video wall bracket is not the same as a standard TV bracket. With a 2x2 wall you need the screens to align precisely so the bezels line up evenly, the depth is consistent, and the overall wall looks professional. That is why video wall mounts typically include micro-adjustment features, allowing installers to fine-tune height, left-right positioning, and depth so the wall appears uniform.
ScreenMoove supplies video wall mounting solutions to support clean, precise installations: Browse video wall mounts
3) Media publishing - media player or PC
A video wall needs a source device to publish content. This is typically a digital signage media player or a PC. The right choice depends on what you want the wall to display and how you plan to manage updates.
Media player
Best for scheduled signage playlists and consistent day-to-day playback.
PC
Ideal for dashboards, advanced applications, live data feeds and multi-window setups.
CMS workflow
Remote updates, scheduling and multi-site control - typically via a player + CMS.
Video wall processor (optional)
Used for complex layouts, multiple sources, or when outputs need combining.
A key consideration is resolution. A 2x2 wall made from Full HD displays (1920 x 1080 each) usually becomes a 4K canvas (3840 x 2160). Your player or PC must be able to output the combined resolution for the wall to look sharp and correctly scaled.
Example signage player: View signage player
4) Cabling and planning
Most video wall installs use DisplayPort or HDMI from the player to the first screen, then DisplayPort between screens when daisy chaining is used. You will also need a power plan for four displays (and potentially one player) plus consideration for cable routes. A clean cable plan improves reliability, reduces service time, and makes the final installation look premium.
Large-format impact: video walls dominate the space and increase visibility from distance.
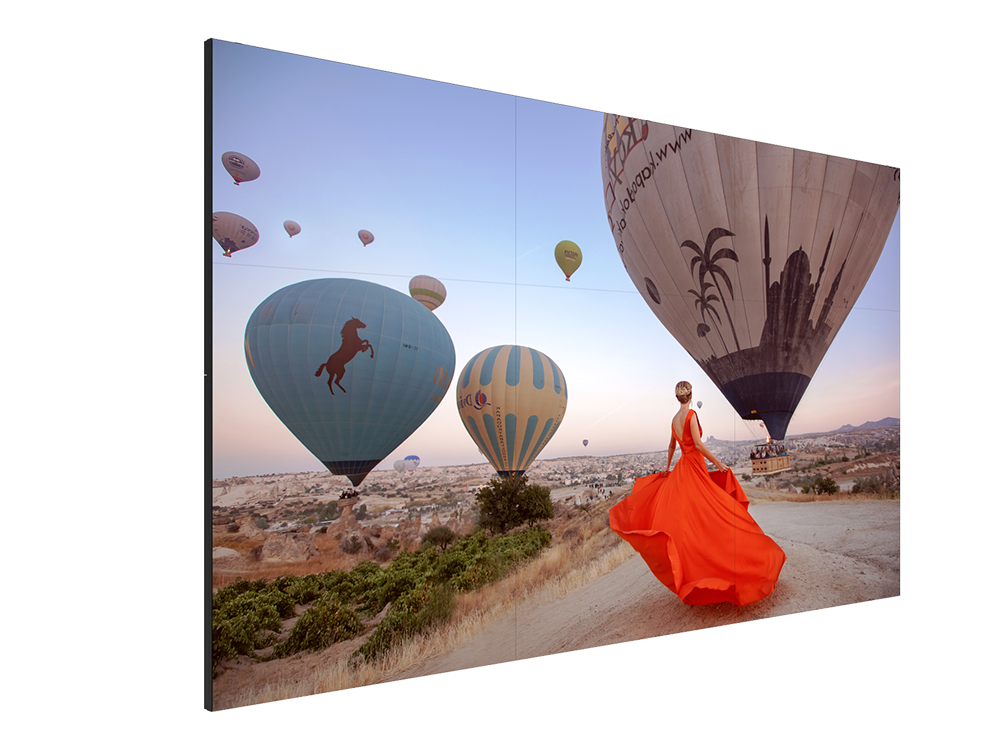
Ultra-narrow bezel panels create a cleaner, more seamless finish for premium environments.
Understanding daisy chain and how it works
Daisy chaining is a method of connecting screens so the video signal passes from one display to the next. Instead of running a separate signal cable from the media player to each screen, you connect the player to the first display, then link the displays together using the display's signal output. This is commonly done using DisplayPort In and DisplayPort Out on professional panels.
Daisy chain in a 2x2 setup (simple signal flow)
Step 1
Media player or PC connects to Screen 1 (DisplayPort In).
Step 2
Screen 1 connects to Screen 2 (DisplayPort Out to DisplayPort In).
Step 3
Screen 2 connects to Screen 3 (continue the chain).
Step 4
Screen 3 connects to Screen 4 - the chain completes the 2x2.
Why daisy chain matters: fewer cables, cleaner installation, faster setup, and easier troubleshooting. It can also reduce the need for extra hardware depending on your setup.
How the screens know what to display
Daisy chaining handles signal distribution, but the wall still needs configuration. In the screen's settings menu (or via control software), you enable video wall mode, set the wall size to 2x2, and assign each screen's position. Once positions are set, each display automatically shows the correct portion of the overall image.
Common daisy chain checks
Use the correct cable type
DisplayPort is typically preferred for daisy chain support and stability.
Match settings
Keep resolution and orientation consistent across all screens.
Check chain order
Wrong order or wrong wall position setting causes incorrect quadrants.
Watch bandwidth limits
Higher refresh/bit depth can reduce chain reliability - keep it practical for signage.
Why bezel size is important (and what we recommend)
The bezel is the physical border around the edge of each display. In a video wall, bezels create the visible lines between panels. In a 2x2 configuration, four bezels meet in the centre, which makes bezel thickness especially noticeable. Thicker bezels can distract from content and reduce the premium feel of the wall.
Bezel impact in real environments
In retail and reception spaces, a video wall is often a focal point. When the wall shows brand visuals, promotions or lifestyle content, an ultra-narrow bezel helps the image feel more continuous. In environments like control rooms, bezels may be less of a concern, but uniformity, reliability, and viewing angles become even more important.
What ScreenMoove recommends
Retail and customer-facing spaces
Choose ultra-narrow bezel panels for a cleaner, premium finish.
Bright environments
Prioritise higher brightness and anti-glare to maintain visibility.
Long operating hours
Use commercial panels rated for extended duty cycles (reliability matters).
Premium environments
Combine narrow bezel with strong colour consistency for the most seamless look.
Start browsing suitable options here: View video wall selections
Step-by-step - configuring a 2x2 LCD video wall
Below is a practical setup process that applies to most professional LCD video wall systems. Exact menu wording varies by brand, but the workflow stays consistent.
Step 1: Plan the wall and measure the space
Confirm the location
Check viewing distance, wall width/height and where the wall will be seen from.
Choose layout
Decide screen size and orientation (landscape is most common for 2x2 walls).
Plan cabling
Map power + signal routes so the finished install stays tidy and serviceable.
Step 2: Install the video wall bracket
Fix to structural points
Secure the mounting system to suitable fixings and wall structure.
Level and align
Use a level and guides - small errors become obvious across four screens.
Confirm micro-adjustment
Ensure you can fine-tune position and depth for a clean final finish.
Step 3: Mount the screens and align
Mount each display
Install screens in the correct grid order, then begin fine alignment.
Align inner edges first
The centre join is most noticeable - make it clean and consistent.
Run a test image
Check bezel spacing, straight lines, and overall symmetry.
Step 4: Connect the source device and daisy chain
Connect source to Screen 1
Use DisplayPort or HDMI as required for your panels and player.
Chain Screen 1 to Screen 4
DisplayPort Out to In through the wall to distribute signal neatly.
Power on and confirm signal
Check each screen detects input before moving to configuration.
Step 5: Enable video wall mode and assign positions
Enable video wall mode
Turn on tiling/wall mode on each display (menu wording varies by brand).
Set wall layout to 2x2
Confirm the correct grid size so the display knows how to split content.
Assign positions
Top-left, top-right, bottom-left, bottom-right must match physical placement.
Step 6: Set resolution, scaling and orientation
Confirm correct output
Make sure the source can output the combined canvas where required.
Disable overscan
If content looks cropped, turn off overscan on the screen or source.
Check scaling
Ensure text and logos are sharp and not stretched or softened.
Step 7: Match brightness and colour
Even the best video wall can look inconsistent if one panel is brighter or warmer than the others. Many professional panels allow you to set brightness and colour consistently across screens. If you see slight differences, adjust brightness first, then fine-tune colour temperature.
Step 8: Publish content in the correct format
For the best result, design content at the combined resolution of the wall. For a typical 2x2 of Full HD screens, that is 3840 x 2160 (4K). If you publish a 1920 x 1080 file across a 4K wall, the content may appear soft or scaled. If you want the wall to look premium, use high-quality assets and avoid compressing videos too heavily.
Expert tip: Keep key text and logos away from the centre join where bezels meet. This maintains readability and avoids splitting important information across panels.
Troubleshooting - common issues and quick fixes
Content is duplicated on multiple screens
Enable video wall mode
Ensure tiling/wall mode is enabled on every screen.
Confirm positions
Top-left/top-right/bottom-left/bottom-right must match physical placement.
Verify chain order
If quadrants are wrong, check chain order and signal routing.
Edges are cropped or the image does not fit
Disable overscan
Turn off overscan in the display or source settings.
Confirm source resolution
Match the intended wall canvas so scaling does not crop the edges.
Review scaling options
Check scaling on the player/PC to ensure content fits cleanly.
One screen looks brighter or a different colour
Match brightness
Set consistent brightness across all panels first.
Align picture mode
Use the same picture mode and colour temperature across the wall.
Fine tune uniformity
Slightly reduce brightness if needed to improve wall consistency.
No signal on one display in the chain
Swap the cable
Replace DisplayPort/HDMI between the affected screens.
Check output settings
Confirm DisplayPort Out is enabled where required.
Isolate the fault
Swap positions to identify whether the issue is cable, port, or screen.
How LCD video walls improve ROI for businesses
A video wall is a long-term asset. When used strategically, it improves marketing performance and reduces recurring operational costs. ROI comes from visibility, engagement, and flexibility.
1
Increased visibility and footfall
Large-format visuals attract attention from distance. In retail and hospitality, that attention can translate into increased footfall, stronger promotion awareness, and more impulse purchases. A video wall also creates presence - it makes a space feel more premium and more established.
2
Higher engagement than static signage
Motion content outperforms printed posters because it catches the eye and keeps attention longer. That extra dwell time helps customers absorb your message and increases brand recall.
3
Reduced print and labour costs
Posters and printed signage have ongoing costs: design tweaks, printing, delivery, installation, and replacement when promotions change. With a video wall, you update content instantly. Over time, this reduces costs and improves speed of execution.
4
Better campaign agility
A video wall allows you to adjust messaging in real time. Run lunch offers at lunchtime, switch to high-margin products during peak trade, or highlight events and seasonal promotions without waiting on print lead times.
5
Multi-use value from one installation
Use one wall for brand visuals, promotions, wayfinding, menus/pricing, upsell messaging, dashboards or live feeds - depending on your environment.
Need special support? If your project requires compatibility checks, layout planning, daisy chain guidance, media player selection, or advice on content resolution, ScreenMoove Experts can help.
Related products (tagged)
These are common components customers need alongside a 2x2 LCD video wall. If you are unsure what is compatible, speak to a ScreenMoove Expert and we will guide you to the right options for your environment and budget.

LCD Video Wall Displays
Browse professional LCD video wall panels designed for commercial installations.
Video Wall Selections
Curated video wall options - ideal starting point if you are unsure what you need.

AG Neovo VWM-01 Video Wall Mount
Micro-adjustment mounting designed for clean alignment and scalable wall builds.

Video Wall Mounts
Explore mounting solutions for different screen sizes and wall requirements.
Qbic BXP-350 Digital Signage Player
A powerful signage player for demanding multi-screen setups and smooth playback.
Philips 49 inch X-Line Video Wall Display
A professional video wall display option for commercial environments and long operating hours.
Why choose ScreenMoove for video wall projects
ScreenMoove supplies commercial digital signage and video wall solutions across the UK. Whether you need the screens only or a full solution with the right mount and player, we help you choose a setup that performs and looks professional.
Commercial video wall displays
Professional panels with ultra-narrow bezel options for a premium finish.
Mounting systems
Micro-adjustment video wall mounts for clean alignment and scalability.
Compatible media players
Reliable publishing hardware for multi-screen playback and scheduling.
Expert support
Guidance on daisy chain, configuration, resolution and content workflow.
Experts: If you need special support, our ScreenMoove Experts can help with specification checks, the right bezel recommendation, planning a clean 2x2 layout, and making sure your content outputs correctly across the full wall.
Speak to a ScreenMoove Expert
Get tailored advice for your 2x2 LCD video wall - screens, bracket, media player, daisy chain setup and content workflow. Call us on 020 8191 9223 or send an enquiry below.
Shop video wall displays